

March 14, 2014
Lumpia Rebung ( bamboo shoots spring roll)
Kepingin banget makan lumpia isi rebung.Sudah lama sebenarnya,hanya saja keinginan untuk membuatnya tidak pernah ada.
Sudah siap 1 kaleng rebung dirumah, dan untungnya ada sisa sambal kacang dari nasi uduk 2 hari lalu.
Jadilah untuk menghabiskan sambel kacang, dan mencapai keinginan makan lumpia rebung, hari ini terlaksana sudah membuat lumpia rebung untuk pertama kalinya dalam hidupku.
Dan ternyata,barusan iseng nge google, ternyata rebung itu mengandung serat yang cukup banyak ya dan vit B6 ada zat besi juga...
Bahan-bahannya :
1 kaleng rebung(Bamboo Shoot)dipotong tipis tipis memanjang atau mau diparut terserah.
3 siung bawang putih
1 siung bawang merah
5 buah ebi( udang kering)
1 sendok makan gula jawa disisir
3 sendok teh gula pasir
3 sendok teh kecap manis
1 sendok teh kecap asin
0,5 cup air
putih telor untuk menempel kulit
ayam fillet dada cincang sedikit saja hanya untuk campuran
garam, lada secukupnya
Minyak untuk menumis dan menggoreng
KUlit lumpia siap pakai
 Caranya:
Air direbus, masukan rebung yang sudah dipotong dan gula pasir. masak sampai air habis.
Diwajan, panaskan minyak, masukan ebi, kemudian bawang putih sampai wangi, bawang merah aduk-aduk sampai kecoklatan.
Masukan fillet ayam yang sudah dicincang, aduk2 matang,
masukan kecap manis, asin, gula jawa sisir, dan rebung yang sudah direbus tadi.
aduk rata sampai semua menyerap.
dinginkan.
Siapkan kulit lumpia, masukan kira2 1 sendok makan atau 2 sendok makan.
Lipat tutup dengan putih telor.
Goreng dalam minyak panas.
sajikan dengan sambal favorit .
aku sudah habis 4 potong... ini hanya jadi 7 potong.
Enakkkk
Caranya:
Air direbus, masukan rebung yang sudah dipotong dan gula pasir. masak sampai air habis.
Diwajan, panaskan minyak, masukan ebi, kemudian bawang putih sampai wangi, bawang merah aduk-aduk sampai kecoklatan.
Masukan fillet ayam yang sudah dicincang, aduk2 matang,
masukan kecap manis, asin, gula jawa sisir, dan rebung yang sudah direbus tadi.
aduk rata sampai semua menyerap.
dinginkan.
Siapkan kulit lumpia, masukan kira2 1 sendok makan atau 2 sendok makan.
Lipat tutup dengan putih telor.
Goreng dalam minyak panas.
sajikan dengan sambal favorit .
aku sudah habis 4 potong... ini hanya jadi 7 potong.
Enakkkk
June 3, 2013
Kue talam ubi
Kangennnn sekali aku nge-blog, pas kebeneran kangennn banget sama talam ubi. Mikirin cetakannya engga punya, mau alternatif pakai ramekin jadi ntar jumbo :). Eh tiba-tiba teringat dengan cetakan kue mangkok yang kubawa dari dari liburan kemaren.


Horaaaayy deh, palingan kecil miripkan.
Sayangnya, kupelit sekali olesi dengan minyak, jadi pas dikeluarkan ada yang mulus ada yang berantakan sedikit
Tapi hati senang, proses pembuatan talam ubi tidaklah repot dan JADI.
Enakkkk....
Resepnya untuk
Bahan ubi
250gr ubi , kukus haluskan
125 ml santan
75gr gula halus
1/2 tsp garam
50gr tepung beras
25gr tepung tapioka
Bahan untuk putih
125ml santan
25ml air panas
25 gr tepung beras
1/4tsp garam
Cara membuat
Olesi cetakan dengan minyak goreng tipis-tipis.
Panaskan kukusan
Bahan ubi : santan dan garam didihkan sambil diaduk. Biarkan hangat
Aduk jadi satu bahan kering dan ubi halus. Masukan santan dan aduk rata.
Masukan ke cetakan tuang 3/4 saja dari cetakan.
Kukus 15 menit atau sampai matang
Bahan putih:
Santan dan garam aduk, didihkan.
Biarkan hangat.
Campur tepung beras dan garam, tuangindengan air panas sambil diaduk dan tuanginsantan aduk rata.
Tuang ke lapisan kuning tadi. Kukus 10 menit.
Keluarkan dari cetakan dan sajikan.
August 31, 2011

August 16, 2011
17 Agustus'an, Red & White Food Photo on Indonesia Independence Day
Sudah lamaaaaaaaaa banget absent dari blog. Berhubung acaranya Ibu Tika dari Red & White Food Photo on Indonesia Independence Day, jadi saya post foto ini.
Sebenarnya ini arsip lama, foto ini diambil tahun 2008 untuk acara Red and White Photo event, link lamanya disini,foto yang disertakan dievent juga yang satu, yang ini dokumentasi saya, hanya saja saya tidak menjelaskan dengan detail apaka ini foto tersebut.
Awalnya,ide saya sewaktu itu adalah kelepon saja yang kelapanya diberikan pewarna merah, dan kelepon putih. Pemikiran yang simple saja karena saya hampir lupa dengan deadline,jadi menggunakan apa yang ada dirumah.
Tetapi setelah melihat hasilnya, saya kurang sreg,intip kulkas ada marshwarllow, ada cherry..merah putih kan.. liat tusuk gigi pula.. gue pikir mmm kayaknya gue bikin model coctail aja kali yee.. pas pula ada sirup marjan seinget gue cocopandan.. jadi dehhh mantep..
Jadi bermodal tusuk gigi, masukin dulu marshmallow,trus kelepon trus cherry... cantik kan akhirnya.. :) Nah gue yakin semua dah tau resep kelepon kan jadi kutak perlu posting resepnya ya.. hanya tinggal kasih pewarna merah aja kok kelapanyaa..
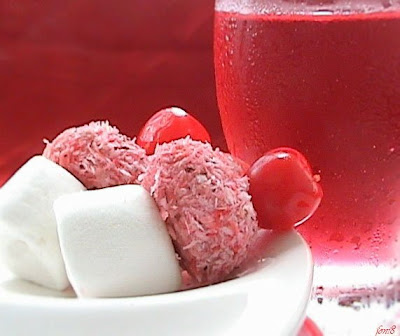
Lomba foto gini bikin jantung gue mo copot, pas submit foto teilee kok deg-deg=an gitu kayak serahin ujian ajaaa...tapi gue sangat puas dengan hasilnya... bongkok-bongkok pegel ambil angel foto.. hampir 1 jam seinget gue cari-cari komposisi,pilih mana yang enak dilihat.. 2foto ini bikin bingung mo serahin mana... meskipun daku tidak menang tapi kusenang bisa partisipasi..
I love U my Indonesia, kedutaan Indonesia sudah ada di Panama tahun ini, jadi sepertinya besok gue akan hadir untuk upacara sekalian merayakan my ulang tahun disana :)
December 10, 2010
Japan
Hola
Back from my 2 weeks trip. Thanks to hubby and my lovely daughter to make this trip happened. Great trip to Los Angeles and Japan. Enjoy my time solo. I guess all mother in this world need a time just like what I had. Felt so different after you came back and meet your family and do your routine. Like hey its a new me..
What I had in Japan was extremely delicious.
My favorite is still Spicy Ramen. Its too good.


Delicious,
July 29, 2010
KBB 18-Macaroons-Chocolate Macaroons

Macaroons, tugas dari KBB kali ini..
Kalau tidak karena tugas kali ini, tidak akan pernah saya mencoba membuatnya. Selama ini hanya mengetahui Macarons dari blogging ke Mbak Arfi, melihat fotonya wah cantik ya macarons, tetapi apa rasanya tidak tahu,karena belum pernah melihat langsung apalagi menyicipi..
Karenanya semangat juga deh bikin PR, penasaran soale seperti apa sihhh French Macarons?
Dengan resep bebas sumber, akhirnya aku pilih ke Martha Stewart's site karena banyak pilihan yang ditawarkan, tadinya kepingin coba coconut Macaroons, akhirnya pertimbangan kegagalan saya putuskan membuat coklat macaroons .
Hasilnya, Babak 1 masuk oven , senang sekali di oven sudah melihat kakinya.. hasilnya seperti ini. Di foto ini, hasil setelah keluar dari oven, ada beberapa yang retak di permukaan, beberapa mulus, terlihat kan? Sayangnya pada saat mau dilepas dari parchment paper, semuanya lengket, sempat diperciki air sedikit tetapi mungkin kurang banyak dan kurang paham, akhirnya hancur deh heheheh

Babak ke 2, wah jelek sekali hasilnya sepertinya suhu oven masih terlalu panas 375F, dimana pemanggangan diminta 325F, yah begini deh kalau tidak sabar, dan terlebih dahulu loyang sedikit dibanting dan mungkin didiamkannya kurang lama .

Langkah-langkah pembuatan ada disini ya,
Untuk almond flour, saya gunakan sliced almond 1 cup di grind di FP sampai halus.
Kalau mau coba , silahkan dikutip resep ini,
Makes 35 macaroons
- 1 cup confectioners' sugar
- 3/4 cup almond flour
- 2 large egg whites, room temperature
- Pinch of cream of tartar
- 1/4 cup superfine sugar
- 3/4 cup seedless raspberry jam, for filling
- MACAROON VARIATIONS
- Chocolate: Substitute 3 tablespoons unsweetened Dutch-process cocoa powder for 1/4 cup of the almond flour.
- Coconut: Substitute 2 tablespoons desiccated unsweetened coconut for 2 tablespoons of the almond flour, and add 1/2 teaspoon rum; sprinkle with additional coconut before baking.
- Peanut: Substitute an equal amount finely ground unsalted peanuts (peanut flour) for the almond flour.
- Pistachio: Substitute 1/2 cup finely ground unsalted pistachios (pistachio flour) for 1/2 cup of the almond flour, and add 2 to 3 drops forest-green gel-paste food coloring.
- Raspberry: Add 1 tablespoon fresh raspberry puree, strained, plus 3 to 4 drops dusty- rose gel-paste food coloring.
- Vanilla Bean: Add 1/2 teaspoon pure vanilla extract or seeds from 1/2 vanilla bean, split and scraped, pod reserved for another use.
- SUGGESTED FILLINGS FOR MACAROONS
- Chocolate: Chocolate Ganache
- Coconut: 1 cup Swiss Meringue Buttercream, mixe d with 1/3 cup angel-flake coconut.
- Peanut: Chocolate Ganache, or store-bought dulce de leche, jam, or peanut butter.
- Pistachio: 1 cup Swiss Meringue Buttercream, mixed with 1/3 cup finely chopped pistachios.
- Raspberry: 3/4 cup seedless raspberry jam
- Vanilla Bean: 1 cup Pineapple Buttercream , 1 cup Swiss Meringue Buttercream, or 3/4 cup store-bought jam or preserves.
Directions
- Pulse confectioners' sugar and almond flour in a food processor until combined. Sift mixture 2 times.
- Preheat oven to 375 degrees. Whisk whites with a mixer on medium speed until foamy. Add cream of tartar, and whisk until soft peaks form. Reduce speed to low, then add superfine sugar. Increase speed to high, and whisk until stiff peaks form, about 8 minutes. Sift flour mixture over whites, and fold until mixture is smooth and shiny.
- Transfer batter to a pastry bag fitted with a 1/2-inch plain round tip, and pipe 3/4-inch rounds 1 inch apart on parchment-lined baking sheets, dragging pastry tip to the side of rounds rather than forming peaks. Tap bottom of each sheet on work surface to release trapped air. Let stand at room temperature for 15 minutes. Reduce oven temperature to 325 degrees. Bake 1 sheet a t a time, rotating halfway through, until macaroons are crisp and firm, about 10 minutes. After each batch, increase oven temperature to 375 degrees, heat for 5 minutes, then reduce to 325 degrees.
- Let macaroons cool on sheets for 2 to 3 minutes, then transfer to a wire rack. (If macaroons stick, spray water underneath parchment on hot sheet. The steam will help release macaroons.)
- Sandwich 2 same-size macaroons with 1 teaspoon jam. Serve immediately, or stack between layers of parchment, wrap in plastic, a nd freeze for up to 3 months.

July 21, 2010
Peanut Butter-filled Chocolate Cupcakes
Yesterday baking was this cupcakes.
In my mind, I was thinking to bake Lapis Surabaya,wajik, or biji salak. All are Indonesian desserts, which I love so much and another options is MACARONS,for 2nd trial to fulfill my KBB task.
But at the end, I baked this cupcakes, as I cant resist the combination between chocolate and peanut butter.

Martha Stewart's Cupcakes book,is the source of this drooling. I got this book while my hubby went to LA last May. Thanks to Amazon who delivered it in a day, and thank to my sister who helped me passed those books to my hubby.
Here, in Panama, well ya there is around 3 bookstores, but they are not so complete compare to bookstore in USA,and mostly all in Spanish.
Ok, back to my cupcakes.
For peanut butter lover, this is worth to try, after a little mess happened while putting the batter to the tin. My daughter cant resist to take one after it out from the oven.

This recipe only makes 12, and I made 14, that is why if you notice at the 1st row, 4 of those cupcakes are looks sink and not too chocolate as I guess I dropped less chocolate batter.
So lets bake,
Makes 12
2\3 cup all- purpose flour
1\2 tsp baking powder
1\4 tsp salt
1\2 cup (1stick) unsalted butter, cut into small pieces.
4 ounces semisweet chocolate,coarsely chopped
2 ounces unsweetened chocolate,coarsely chopped
1\4 cup granulated sugar
3 large eggs
2 tsp pure vanilla extract
Peanut Butter Filling
recipe for Peanut Butter Filling
for 12 cupcakes
4 tbsp (1\2 stick) unsalted butter,melted
1\2 cup confectioners sugar, sifted
3\4cup smooth peanut butter
1\4 tsp salt
1\2 tsp pure vanilla extract.
Stir together all ingredients until smooth. Use immediately.

Method:
1.Preheat oven to 325F. Line a standard muffin tin with paper liners. Whisk together flour, baking powder and salt. Put butter and chocolates in a heatproof bowl set over(not in) a pan of simmering water, stir until melted. Remove from heat, and let cool slightly.
2. Whisk granulated sugar into cooled chocolate mixture. Add eggs, and whisk until mixture is smooth. Stir in vanilla. Add flour mixture, stir until well incorporated.
3. Spoon 2 tbsp chocolate batter into each lined cup, followed by 1 tbsp peanut butter filling. Repeat with another tablespoon of batter, and top with 1 tbsp filling. Swirl top of cupcake batter and filling with a wooden skewer or toothpick.
4. Bake, rotating tin halfway through, until a cake tester inserted in centers comes out with only a few moist crumbs attached, about 40 minutes. Transfer tin to a wire rack to cool completely before removing cupcakes. Cupcakes can be stored up to 3 days at room temperature in airtight containers.
The fact:
1. This is the 2nd day I enjoy this cupcakes. And I feel its like a brownies. I prefer the taste today to last night when it fresh from the oven..
2. Do not forget, we dont need mixer to make this cupcakes.
3. Its says and its the fact
page 118,Martha Stewart's Cupcakes book.
In my mind, I was thinking to bake Lapis Surabaya,wajik, or biji salak. All are Indonesian desserts, which I love so much and another options is MACARONS,for 2nd trial to fulfill my KBB task.
But at the end, I baked this cupcakes, as I cant resist the combination between chocolate and peanut butter.

Martha Stewart's Cupcakes book,is the source of this drooling. I got this book while my hubby went to LA last May. Thanks to Amazon who delivered it in a day, and thank to my sister who helped me passed those books to my hubby.
Here, in Panama, well ya there is around 3 bookstores, but they are not so complete compare to bookstore in USA,and mostly all in Spanish.
Ok, back to my cupcakes.
For peanut butter lover, this is worth to try, after a little mess happened while putting the batter to the tin. My daughter cant resist to take one after it out from the oven.

This recipe only makes 12, and I made 14, that is why if you notice at the 1st row, 4 of those cupcakes are looks sink and not too chocolate as I guess I dropped less chocolate batter.
So lets bake,
Makes 12
2\3 cup all- purpose flour
1\2 tsp baking powder
1\4 tsp salt
1\2 cup (1stick) unsalted butter, cut into small pieces.
4 ounces semisweet chocolate,coarsely chopped
2 ounces unsweetened chocolate,coarsely chopped
1\4 cup granulated sugar
3 large eggs
2 tsp pure vanilla extract
Peanut Butter Filling
recipe for Peanut Butter Filling
for 12 cupcakes
4 tbsp (1\2 stick) unsalted butter,melted
1\2 cup confectioners sugar, sifted
3\4cup smooth peanut butter
1\4 tsp salt
1\2 tsp pure vanilla extract.
Stir together all ingredients until smooth. Use immediately.

Method:
1.Preheat oven to 325F. Line a standard muffin tin with paper liners. Whisk together flour, baking powder and salt. Put butter and chocolates in a heatproof bowl set over(not in) a pan of simmering water, stir until melted. Remove from heat, and let cool slightly.
2. Whisk granulated sugar into cooled chocolate mixture. Add eggs, and whisk until mixture is smooth. Stir in vanilla. Add flour mixture, stir until well incorporated.
3. Spoon 2 tbsp chocolate batter into each lined cup, followed by 1 tbsp peanut butter filling. Repeat with another tablespoon of batter, and top with 1 tbsp filling. Swirl top of cupcake batter and filling with a wooden skewer or toothpick.
4. Bake, rotating tin halfway through, until a cake tester inserted in centers comes out with only a few moist crumbs attached, about 40 minutes. Transfer tin to a wire rack to cool completely before removing cupcakes. Cupcakes can be stored up to 3 days at room temperature in airtight containers.
The fact:
1. This is the 2nd day I enjoy this cupcakes. And I feel its like a brownies. I prefer the taste today to last night when it fresh from the oven..
2. Do not forget, we dont need mixer to make this cupcakes.
3. Its says and its the fact
An abundance of creamy peanut-butter filling tenders these cupcakes extra rich and irresistible. The batter and filling-each whisked together by hand-are layered then swirled to create the marbleized pattern on top.
page 118,Martha Stewart's Cupcakes book.
Subscribe to:
Posts (Atom)